Essay for August 2013: DIY
This essay is not about the animals and plants that live OTD, but rather about equipment I have constructed to study them. However, I believe the important issue is not this equipment, but rather a much more general issue: Do It Yourself (DIY).
In the last 30 years or so, more and more sophisticated electronic and electro-mechanical components have been used in the construction of low cost consumer products. Examples are digital watches, computers, game machines, printers, digital cameras, FAX machines, etc. Even"simple" products, such as a home thermostat, use a rather sophisticated microprocessor to implement function. High cost products, such as automobiles and airplanes, have a greater proportion of cost in associated electronics in newer models.
This process is auto-catalytic because the unit cost of making modern electronics is inversely proportional to the number of units made. More units are made and cost decreases, units are used in more applications because they are cheap, this drives the cost lower, and so on and so on.
What does this mean for us?
It means that we can make complicated devices ourselves. This is important not only because we can make them at low cost, but because we can make equipment that does just what we want. In the old world, a manufacturer will (and only can) make something if a large number of customers will buy the something. In the new world we can make a One Off; something only we may want. This is possible not only because the components are cheap, but because many entrepreneurs have created small companies that cater to the DIY movement. These companies, which manly exist on the Internet, make it east to buy components, supply directions to use them, host blog sites for those that use their devices to make things. It is a social community similar to the community that nurtured the birth of the personal computer.
The really BIG PICTURE
The DIY paradigm can be applied to many aspects of our life. Buy your food in a box (or can) or make it yourself. You can fill in the many other choices we make every day.
My Need
In the May 2013 essay of this series I describe the tunicate Corella, which is almost completely transparent. I am studying the circulation in this animal, and one way to do this is to inject a fluorescent dye into a vessel. This requires a syringe that delivers small, precise volumes (on the order of 1-100 micro liters).
The needle and syringe
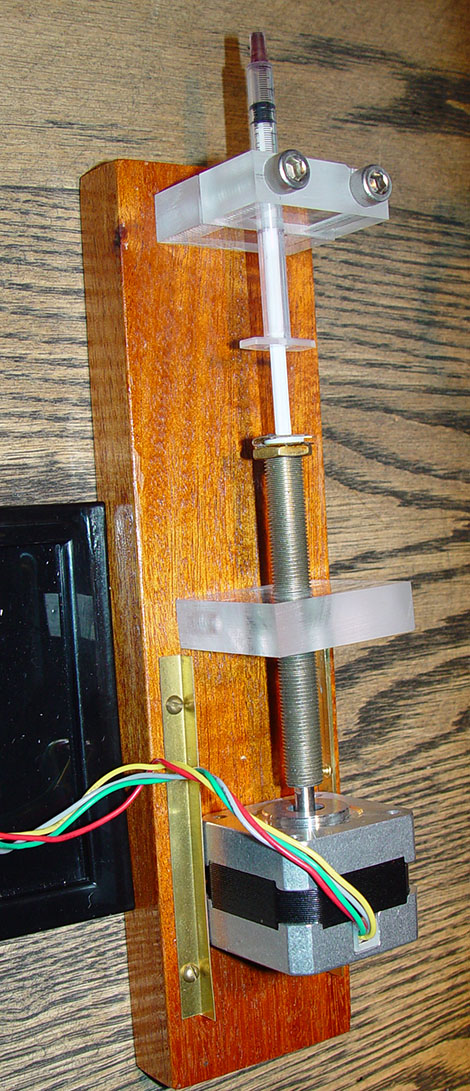
The needle is a 33 gauge disposable, commonly used to deliver insulin. It's diameter is about 0.2 mm, and it has the standard cutting tip. This is the smallest one I could find on the Internet. The needle fits into the hub of a syringe that has been cut off the syringe and glued to polyethylene tubing that is attached to a needle attached to the syringe.
The syringe motor driver
The central part of the driver is a segment of 3/8 inch OD brass coated, treaded tube. This is the same tubing used to hold the light bulb receptacle in a table lamp, and is available in any hardware store. The brass coating means that you can solder to it. A brass clip which fits over the end of the syringe plunger is soldered to the end of the treaded tube. The threaded tube passes through a threaded 3/8 thick block of Lucite, and is attached to the stepping motor. As the stepping motor turns, it moves along the wood base, and is loosely constrained along its travel by two brass L stripes. Because the motor is heavy, and the torque is modest, the motor moves between the brass L stripes without jumping out.
When the motor turns, the syringe plunger both rotates and moves laterally. The rotation is beneficial, because it breaks what would otherwise be static friction in the syringe plunger.
The controller
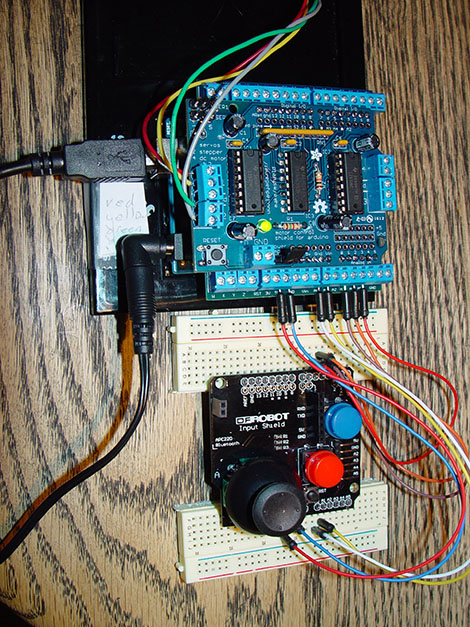
To control the stepping motor that drives the syringe I use an Adurno processor unit. These were developed mainly for educational purposes, but they have many practical uses also. The units were developed in Italy, but are sold through many retail stores. There are more powerful units now available, e.g. the Raspberry Pi, but the Adurno is simple, cheap, and a good choice if you mainly want to control a few devices.
In the lower panel to the right, at the top you see a sandwich of a Adurno processor board, a terminal board, and the stepper control board. Seven wires go to a joystick unit mounted on a prototype board. With the joystick I control the speed of the syringe, and pushing on the top injects a small fixed volume. The rotations of the motor are sent to the PC, and can be saved to provide a time-volume log of the injection.
Actually wiring and programing a microprocessor takes time, the less experience you have the more time. However, it's an investment in the future. Try [1] and [2] to get started, but there is much more on the Internet about microprocessors. Happy coding!

